
Advantages of AutoUpgrade Utility:
==========================
1. Time saving method (completes the upgrade in a short time)
2. can upgrade multiple Oracle Database deployments at the same time, using a single configuration file, customized as needed for each database deployment.
3. preventing the issues before upgrade.
4. It automatically performs the preupgrade and post upgrade steps/checks.
AUTOUPGRADE PROCESSING MODES:
==============================
Generally AutoUpgrade processes in four modes, they are ,
Analyze
It performs a read only pre-upgrade analysis of databases before upgrade and detects any issues which may prevent the successful completion of upgradation.it should be run in the source database like normal operations.
Fixups
In Fixups mode it checks the same as it have done in the analyze mode, so that it can identify issues that require fixing. In Fixup Mode, the AutoUpgrade utility detects and identifies both fixes that require manual intervention and AutoUpgrade utility can clear the fixduring upgrade.
Deploy
In deploy mode it confirms that our database has been successfully upgraded and it copies the sqlnet.ora, listener.ora, tnsnames.ora from source to target home.
Upgrade
An upgrade completes with either deploy or upgrade, after this we can run our post upgrade checks.in this we can run our custom scripts on the upgraded databases in accordance with the configuration file that we have created. After this the upgraded oracle database starts with a new oracle home.
AutoUpgrade utility jobs pass through a series of phases, called stages, during which specific actions are performed.
=============================
AutoUpgrade has the following stages,
SETUP
PREUPGRADE
PRECHECKS
GRP
PREFIXUPS
DRAIN
DBUPGRADE
POSTCHECKS
POSTFIXUPS
POSTUPGRADE
=================
Analyze Mode: Setup, Prechecks.
Fixups Mode: Setup, Prechecks, and Prefixups.
Deploy Mode: Setup, Guaranteed Restore Point (GRP), Preupgrade, Prechecks, Prefixups, Drain, DB (database) Upgrade, Postchecks, Postfixups, and Postupgrade. You can run your own scripts before the upgrade (Preupgrade stage) or after the upgrade (Postupgrade stage), or both before and after the upgrade.
Upgrade Mode: Setup, DB (database) Upgrade, Postchecks, and Postfixups.
====================
global.autoupg log_dir=/home/oracle/autoupg
upg1.sid=CDB122
upg1.source_home=/u01/app/oracle/product/12.2.0/dbhome_1
upg1.target_home=/u01/app/oracle/product/19.1.0/dbhome_1
upg1.target_cdb=cdb21x
upg1.pdbs=pdb_2
upg1.target_pdb_name.pdb_2=depsales
upg1.target_pdb_copy_option.pdb_2=file_name_convert=('pdb_2','depsales')
================
create_sample_file
-------------------------
The AutoUpgrade parameter create_sample_file generates either a configuration file, or a settings file. You edit these files to create production configuration or settings files for AutoUpgrade.
==================================
AutoUpgrade has the following stages:
SETUP: The initial stage that the AutoUpgrade utility job manager creates as part of the preparation for starting a job.
PREUPGRADE: The stage in which AutoUpgrade performs checks of your system, based on your current system configuration to determine its readiness for upgrade, such as checking to determine if you have sufficient available disk space.
PRECHECKS: The stage in which AutoUpgrade analyzes your source Oracle home to determine if the database meets the requirements for upgrade.
GRP: The guaranteed restore point (GRP), which AutoUpgrade creates before starting the upgrade process. This option is only available for Oracle Database Enterprise Edition releases. It is not available for Oracle Database Standard Edition. Even though AutoUpgrade creates a GRP by default, Oracle highly recommends that you perform a backup before starting your upgrade.
PREFIXUPS: The stage in which AutoUpgrade performs preupgrade fixups before starting the upgrade. For example, this is the stage in which AutoUpgrade gathers dictionary statistics on the source Oracle home.
DRAIN: The stage during which AutoUpgrade shuts down the database.
DBUPGRADE: The stage in which AutoUpgrade performs the upgrade, and compiles any invalid objects that are found after the upgrade completes.
POSTCHECKS: The stage in which AutoUpgrade performs checks on the target Oracle home (the upgraded Oracle Database) before starting postupgrade fixups.
POSTFIXUPS: The stage in which AutoUpgrade performs processing of postupgrade fixups, such as upgrading the time zone.
POSTUPGRADE: The stage in which AutoUpgrade copies or merges the source Oracle home configuration files (tnsnames.ora, sqlnet.ora, and other files) to the target Oracle home.
=================
Options
Valid values
12.2
18
19
21
Example
Copy
global.target_version=19
employees.target_version=12.2
===========================
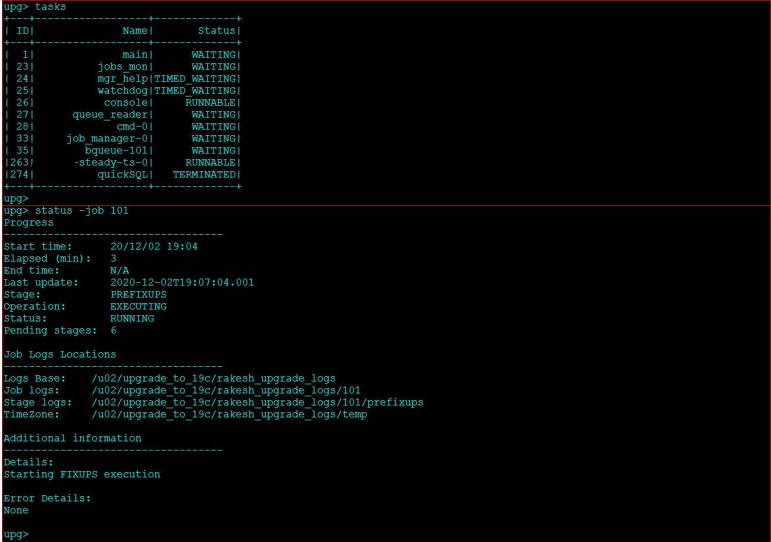
There are three main commands in this upgrade to check the status of the upgrade.
lsj – list the jobs which are running.
tasks – to see the tasks of the jobs and their status.
status -job 102 – it gives an overall summary of the upgrade, here we can see the no of container and non-container databases, job finished successfully, job aborted and jobs which are in progress state.
======================
We have a 12cR1 database. Database name is ‘sha’ and version is 12.1.0.2.0 as can be
seen from below image.

Lets make a table in scott schema as we will check the table exists after upgradation.
SQL> CREATE TABLE scott_test
(
 id NUMBER,
 description VARCHAR2(50)
);
Lets input some data inside table.
SQL> INSERT /*+ APPEND */ INTO scott_test
SELECT level, 'Description for ' || level
FROM dual
CONNECT BY level <= 10000;

SQL> commit;

SQL> select count(id) from scott_test;
COUNT(ID)
----------
 10000

If possible take a full backup of database.
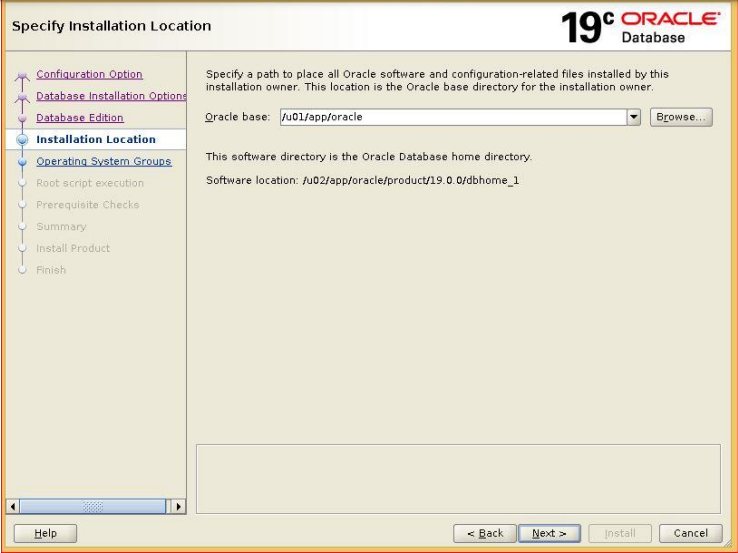
Unzip and Install 19C database software only.
Note- Database zip file to be extracted to NEW ORACLE_HOME location only as during installation, the
software location is auto selected as ORACLE_HOME and no option to change the location.
It is best practice to recompile invalid objects, gather dictionary stats before going for
upgradation.
SQL> @$ORACLE_HOME/rdbms/admin/utlrp.sql
ERRORS DURING RECOMPILATION
---------------------------
 0
Function created.
PL/SQL procedure successfully completed.
Function dropped.
...Database user "SYS", database schema "APEX_040200", user# "98" 18:43:54
...Compiled 0 out of 3014 objects considered, 0 failed compilation 18:43:54
...271 packages
...263 package bodies
...452 tables
...11 functions
...16 procedures
...3 sequences
...457 triggers
...1320 indexes
...211 views
...0 libraries
...6 types
...0 type bodies
...0 operators
...0 index types
...Begin key object existence check 18:43:54
...Completed key object existence check 18:43:54
...Setting DBMS Registry 18:43:54
...Setting DBMS Registry Complete 18:43:55
...Exiting validate 18:43:55
PL/SQL procedure successfully completed.

SQL> SELECT count(*) FROM DBA_OBJECTS WHERE STATUS='INVALID';
 COUNT(*)
----------
 0

SQL> EXEC DBMS_STATS.GATHER_DICTIONARY_STATS;
PL/SQL procedure successfully completed.
Make sure recyclebin is empty if not then purge recyclebin:
SQL> PURGE DBA_RECYCLEBIN;
DBA Recyclebin purged.

SQL> SELECT COUNT(*) FROM DBA_RECYCLEBIN;
 COUNT(*)
----------
 0
Let us make one directory called ‘/u02/upgrade_to_19c/’ which will hold all the config
files, log files during this upgrade.
[oracle@11g ~]$ cd /u02
[oracle@11g u02]$ mkdir upgrade_to_19c
[oracle@11g u02]$ cd upgrade_to_19c/
[oracle@11g upgrade_to_19c]$
Make sure JDK is installed in our linux OS. If not, then download JDK 8 rpm file and install
through root and check java version as image below:

Go to the ‘upgrade_to_19c’ directory and create a sample config file:
[oracle@11g upgrade_to_19c]$
java -jar /u02/app/oracle/product/19.0.0/dbhome_1/rdbms/admin/autoupgrade.jar -create_sample_file config

Created sample configuration file /u02/upgrade_to_19c/sample_config.cfg

[oracle@11g upgrade_to_19c]$ ls -lrt
total 4
-rw-r--r-- 1 oracle oinstall 1943 Dec 2 14:06 sample_config.cfg
Edit the sample config file as per situation, below is our configuration:
global.autoupg_log_dir=/u02/upgrade_to_19c/global_logs
upg1.dbname=sha
upg1.start_time=NOW
upg1.source_home=/u01/app/oracle/product/12.1.0 /dbhome_1
upg1.target_home=/u02/app/oracle/product/19.0.0/dbhome_1
upg1.sid=sha
upg1.log_dir=/u02/upgrade_to_19c/sha_upgrade_logs
upg1.upgrade_node=11g.localdomain
upg1.target_version=19
#upg1.run_utlrp=yes
#upg1.timezone_upg=yes
Where database name, source_home and target_home, sid is to be provided. Log locations to be provided as desired

Note: we can upgrade many databases in parallel with the config file by this auto upgrade
method
Rename the sample config file as sid_config.cfg, for our database its sha_config.cfg
[oracle@11g upgrade_to_19c]$ mv sample_config.cfg sha_config.cfg
[oracle@11g upgrade_to_19c]$ ll
total 4
-rw-r--r-- 1 oracle oinstall 374 Dec 2 14:13 sha_config.cfg
The Four Modes of Auto Upgrade processing described in Oracle Docs (ANALYZE, FIXUP,
DEPLOY & UPGRADE).
ANALYZE: This mode perform pre-checks on source database to see if it is ready for upgrade. It will only
 ANALYZE the source database and will to perform any changes.

FIXUPS: This mode performs the pre-checks on source database, also it will attempt to fix up the items that
 must be corrected before it can be upgraded.

DEPLOY: This mode will perform actual upgrade of the source database. If needed it can also perform mixups on database.

UPGRADE: Upgrade mode enables us to upgrade the target Oracle Home in cases where we do not have
 access to source Oracle Home.
We can run auto upgrade directly in DEPLOY mode without running ANALYZE and FIXUPS mode. But if we
 do not want to take chances to see unforeseen abortion of upgrade, we better run it in ANALYZE and
 FIXUPS mode before running it in DEPLOY mode
Make sure database should be up and running, then run the analyze mode from
upgrade_to_19c directory location:
[oracle@12cr1 upgrade_to_19c]$ java -jar
/u02/app/oracle/product/19.0.0/dbhome_1/rdbms/admin/autoupgrade.jar -config sha_config.cfg -mode
ANALYZE
While the process goes we can always check process by ‘lsj’ command in upgrade console

Check the error log in /u02/upgrade_to_19c/sha_upgrade_logs/100/autoupgrade_err.log

As no error found in error log we will go for deploy mode:
[oracle@12cr1 upgrade_to_19c]$
java -jar /u02/app/oracle/product/19.0.0/dbhome_1/rdbms/admin/autoupgrade.jar -config sha_config.cfg
-mode DEPLOY
While the process goes we can always check process by ‘lsj’ command, status by ‘status –
job 101’ command and tasks going on and pending by ‘tasks’ command in upgrade
console.
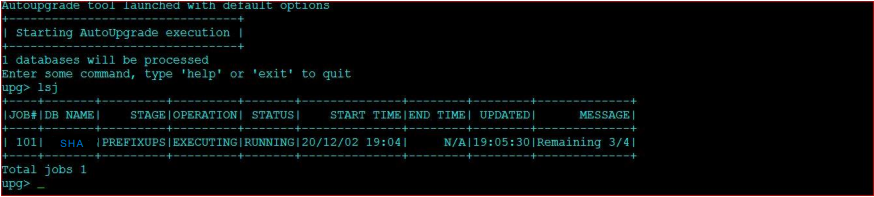
Now we have encountered an error of minimum FRA size which is to be manually fixed.

Let us make the FRA size = 16000 MB

Let us go for upgrade in deploy mode again (remember to move the error logs in a
different location to avoid upgrade conflict).
[oracle@12cr1 upgrade_to_19c]$ mv global_logs/ /u01
[oracle@12cr1 upgrade_to_19c]$ mv sha_upgrade_logs/ /u01
[oracle@12cr1 upgrade_to_19c]$
java -jar /u02/app/oracle/product/19.0.0/dbhome_1/rdbms/admin/autoupgrade.jar -config sha_config.cfg
-mode DEPLOY
Now this time it has started upgradation:

Auto upgrade facility will make a guaranteed restore point of our database by itself by
which we can get back to previous version if anything goes wrong.

By ‘lsj’ command we can always check the progress of our database upgradation:
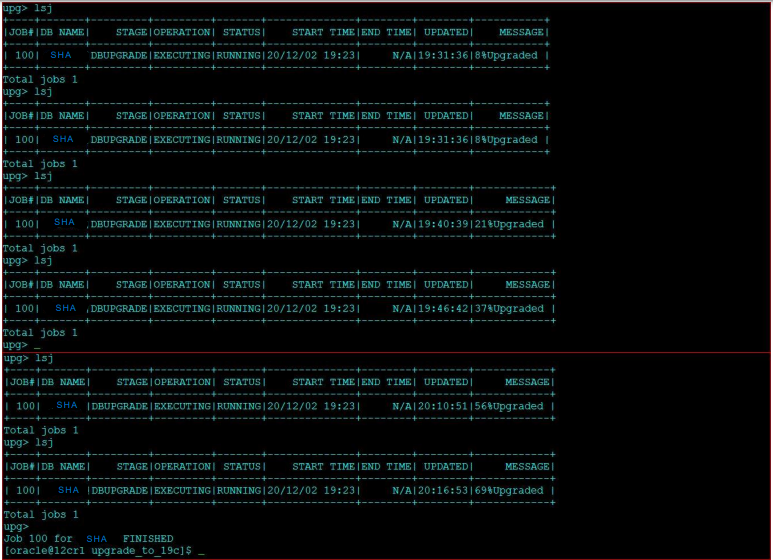
As we can see job for upgradation has been finished. Now let us do some port upgrade
checks and jobs.
First of all let us move password file and spfile to new ORACLE_HOME/dbs location and
listener and tns files to new ORACLE_HOME/network/admin location.

Let us set new ORACLE_HOME and new PATH for 19c
[oracle@12cr1 admin]$ echo $ORACLE_HOME
/u01/app/oracle/product/12.1.0/dbhome_1

[oracle@12cr1 admin]$ echo $PATH
/usr/local/bin:/usr/bin:/usr/local/sbin:/usr/sbin:/home/oracle/.local/bin:/home/oracle/bin:/u01/app/oracle/product/12.1.0/dbhome_1/bin

[oracle@12cr1 admin]$ export ORACLE_HOME=/u02/app/oracle/product/19.0.0/dbhome_1

[oracle@12cr1 admin]$ export PATH=/usr/local/bin:/usr/bin:/usr/local/sbin:/usr/sbin:/home/oracle/.local/bin:/home/oracle/bin:/u02/app/oracle/product/19.0.0/dbhome_1/bin

[oracle@12cr1 admin]$ echo $ORACLE_HOME
/u02/app/oracle/product/19.0.0/dbhome_1

Let us do the post upgrade invalid object compilation and gather dictionary stats:
[oracle@12cr1 admin]$ sqlplus / as sysdba
SQL*Plus: Release 19.0.0.0.0 - Production on Wed Dec 2 22:54:43 2020
Version 19.3.0.0.0
Copyright (c) 1982, 2019, Oracle. All rights reserved.
Connected to:
Oracle Database 19c Enterprise Edition Release 19.0.0.0.0 - Production
Version 19.3.0.0.0

SQL> @$ORACLE_HOME/rdbms/admin/utlrp.sql
Session altered.

SQL> EXEC DBMS_STATS.GATHER_DICTIONARY_STATS;
PL/SQL procedure successfully completed.

SQL>
Let us check the timezone:
Let us check the timezone:
In our case the current timezone and latest timezone is same so we need not to do
anything. If it is found different then the current timezone need to be updated.
SQL> SELECT VERSION FROM V$TIMEZONE_FILE;
 VERSION
----------
 32

SQL> SELECT DBMS_DST.get_latest_timezone_version FROM DUAL;
GET_LATEST_TIMEZONE_VERSION
---------------------------
 32

Now check the database version and mode:
SQL> SELECT NAME,HOST_NAME,VERSION,OPEN_MODE FROM V$DATABASE,V$INSTANCE;

As we can see our database has been upgraded to 19c but it is still compatible to
12.1.0.2.0 as we need confirmation from all application team for full compatibility and we
still have a restrore point incase anything goes wrong with upgradation and we can
always get back to backward with restore point.
SQL> sho parameter compatible

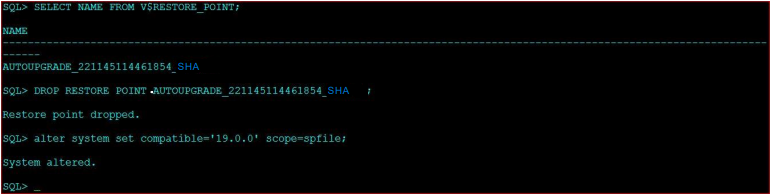
If we get permission from client to set new compatibility of 19.0.0 we need to delete the
restore point first and set the compatibility parameter to spfile and bounce the database
to set compatibility:
SQL> DROP RESTORE POINT AUTOUPGRADE_221145114461854_SHA;
Restore point dropped.

SQL> alter system set compatible='19.0.0' scope=spfile;
System altered.
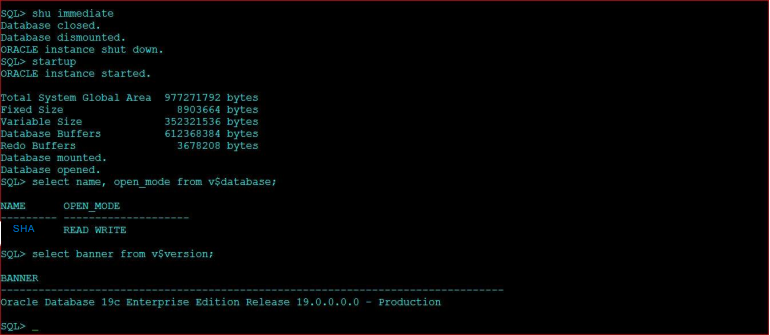
Finally our database is fully upgraded to 19c.
SQL> select name, open_mode from v$database;
NAME OPEN_MODE
--------- --------------------
SHA READ WRITE
SQL> select banner from v$version;
BANNER
--------------------------------------------------------------------------------
Oracle Database 19c Enterprise Edition Release 19.0.0.0.0 – Production
We can check the scott_test table to confirm table existence from previous version.
SQL> conn scott/tiger
Connected.
SQL> select count(id) from scott_test;
COUNT(ID)
----------
 10000